Friday, March 31, 2017

ESP8266, BME280 and OLED Displays

Now that we've successfully read temperature, humidity, and air pressure from a BME280, we turn to the problem of making this data available without having to use a serial monitor. Our first solution is to use a tiny OLED display.

In this tutorial we will:

  1. Install the Correct Library
  2. Add the Display to the Breadboard
  3. Test the Display
  4. Show Sensor Data in the Display


Install the Correct Library
A wide variety of tiny OLED displays are available, and for this tutorial we'll be using a 0.96 inch, monochrome, 128 x 64 pixel screen that is driven by the SSD1306, and that has an I2C interface. As it goes, this device has I2C address 0x3c. There are several libraries for the SSD1306, and we will use the one entitled "ESP8266 and ESP32 Oled Driver for SSD1306 display by Daniel Eichhorn, Fabrice Weinberg". To install this library:

  1. In the Arduino IDE, choose the menu Sketch | Include Library | Manage Libraries...
  2. Enter SSD1306, click the right one, and install the latest version of that library (currently version 3.2.7).


Add the Display to the Breadboard
Along the top of the display there will be four pins that read something like

  • GND, VCC, SCL, and SDA
  • or GND, VDD, SCK, and SDA

First disconnect the BME280, then wire the display as follows:

  • ESP8266 <--> OLED
  • 3V3 <--> VCC
  • GND <--> GND
  • SCL <--> D5
  • SDA <--> D6

If there isn't room on the breadboard to add the display, either use a full-size breadboard or use a second half-sized breadboard!


Test the Display
Ignoring the BME280 for a minute, the following sketch tests the features we will be using when we display data from the BME280.

The library works as follows:

  1. We initialize it in the setup() function, and we flip the screen vertically. The end result is to create a memory buffer
  2. Drawing commands will be written to this buffer - they will NOT be immediately visible
  3. When we are ready, write the buffer to the display using the command:
    display.display();

We will be using the following commands in the final sketch:

  • display.setFont(fontName);
  • display.drawString(x, y, message);
  • display.display();
  • display.clear();
There are many other commands in this library - check out the sample code!

 1
 2
 3
 4
 5
 6
 7
 8
 9
10
11
12
13
14
15
16
17
18
19
20
21
22
23
24
25
26
27
28
29
30
31
32
33
34
35
36
37
38
39
40
41
42
43
44
45
/*
 * Simple-OLED-Test
 * 
 * By: Mike Klepper
 * Date: 29 March 2017
 * 
 * This program demonstrates a VERY few simple commands from the
 * "ESP8266 Oled driver library for SSD1306 display" library 
 * by Daniel Eichhorn, Fabrice Weinberg.
 * 
 * Connections:
 * Display VCC --> NodeMCU 3V3
 * Display GND --> NodeMCU GND
 * Display SCL --> NodeMCU D5
 * Display SDA --> NodeMCU D6
 */

#include "SSD1306.h"

SSD1306 display(0x3c, D6, D5);

void setup() 
{
  display.init();
  display.flipScreenVertically();
}

void loop() 
{
  display.clear();
  
  display.drawRect(0, 0, DISPLAY_WIDTH, DISPLAY_HEIGHT);
  
  display.setFont(ArialMT_Plain_16);
  display.drawString(20, 7, "Hello, world!");
  
  display.setFont(ArialMT_Plain_10);
  display.drawString(8, 30, "DISPLAY_WIDTH = " + String(DISPLAY_WIDTH));
  display.drawString(8, 45, "DISPLAY_HEIGHT = " + String(DISPLAY_HEIGHT));
  
  display.display();

  yield();
  delay(2000);
}

18Include the library we downloaded earlier
20Create a display with I2C address 0x3c, the SDA connected to D6, and the SCL connected to D5
24Initialize the display (this creates the buffer)
25Change the orientation of the display
30Clear the buffer
32Draw a border around the screen - notice that the library makes two constants available to us: DISPLAY_WIDTH and DISPLAY_HEIGHT
34Set the font we'll be using.
35Print "Hello, world!" at x = 20 and y = 7
37Change font to ArialMT_Plain_10
38 - 39Print the screen width - note that this value is available in the constants DISPLAY_WIDTH and DISPLAY_HEIGHT
41Copy the buffer to the physical display
43-44Wait for a bit before doing it all again

The library includes three fonts: ArialMT_Plain_10, ArialMT_Plain_16, and ArialMT_Plain_24. Additional fonts can be created using the tools found at:


Show Sensor Data on the Display
Now we will show the temperature, humidity and barometric pressure on the display. To make this a little more interesting, we will alternate showing British units and metric units.

You would think that pulling this off would be simply a matter combining the above code with the sketch from the last tutorial - after all, there is no pin overlap, right? As it goes, restoring the jumper wires as follows WILL NOT WORK!

The ESP8266 has exactly one I2C bus, so the two devices (the BME280 and the OLED display) must be on that one I2C bus! Here's what the connections will look like on a full-sized breadboard.

Once the connections are correct, the code is very easy!

  1
  2
  3
  4
  5
  6
  7
  8
  9
 10
 11
 12
 13
 14
 15
 16
 17
 18
 19
 20
 21
 22
 23
 24
 25
 26
 27
 28
 29
 30
 31
 32
 33
 34
 35
 36
 37
 38
 39
 40
 41
 42
 43
 44
 45
 46
 47
 48
 49
 50
 51
 52
 53
 54
 55
 56
 57
 58
 59
 60
 61
 62
 63
 64
 65
 66
 67
 68
 69
 70
 71
 72
 73
 74
 75
 76
 77
 78
 79
 80
 81
 82
 83
 84
 85
 86
 87
 88
 89
 90
 91
 92
 93
 94
 95
 96
 97
 98
 99
100
101
102
103
104
105
106
107
108
109
110
111
112
113
114
115
116
117
118
119
120
121
122
123
124
125
126
127
128
129
130
131
132
133
134
135
136
137
138
139
140
141
142
143
144
145
146
147
148
149
150
151
152
/**
 * BME280-OLED
 * 
 * By: Mike Klepper
 * Date: 31 March 2017
 * 
 * This program reads data from the BMP280 and shows it on a 
 * SSD1306 OLED display. It will alternte between British and 
 * metric units.
 * 
 * See blog post on patriot-geek.blogspot.com 
 * for connections.
 */

#include "Wire.h"
#include "Adafruit_Sensor.h"
#include "Adafruit_BME280.h"
#include "SSD1306.h"

const float SEA_LEVEL_PRESSURE_HPA = 1013.25;
const int DELAY = 3000;
const int STARTUP_DELAY = 500;


Adafruit_BME280 bme;

SSD1306 display(0x3c, D6, D5);

void setup() 
{
  Serial.begin(115200);
  
  if(!bme.begin())
  {
    Serial.println("Could not find a valid BME280 sensor, check wiring!");
    while (1)
    {
        yield();
        delay(DELAY);
    }
  }
  delay(STARTUP_DELAY);

  display.init();
  display.flipScreenVertically();

}

void loop() 
{
  float tempC = bme.readTemperature();
  float humidity = bme.readHumidity();
  float pressurePascals = bme.readPressure();

  // Print to serial monitor
  printToSerial(tempC, humidity, pressurePascals);

  // Display data on screen in British units
  drawWithBritishUnits(tempC, humidity, pressurePascals);
  yield();
  delay(DELAY);

  // Display data on screen in metric units
  drawWithMetricUnits(tempC, humidity, pressurePascals);
  yield();
  delay(DELAY);
}


void drawWithBritishUnits(float tempC, float humidity, float pressurePascals)
{
  float tempF = 9.0/5.0 * tempC + 32.0;
  float pressureInchesOfMercury = 0.000295299830714 * pressurePascals;
  
  display.clear();
  
  display.drawRect(0, 0, DISPLAY_WIDTH, DISPLAY_HEIGHT);
  
  display.setFont(ArialMT_Plain_16);
  display.drawString(35, 3, "BME280");
  
  display.setFont(ArialMT_Plain_10);
  display.drawString(5, 22, "Temperature = " + String(tempF) + " *F");
  display.drawString(5, 35, "Humidity = " + String(humidity) + "%");
  display.drawString(5, 48, "Pressure = " + String(pressureInchesOfMercury) + " inHg");
  
  display.display();
}

void drawWithMetricUnits(float tempC, float humidity, float pressurePascals)
{
  float pressureHectoPascals = pressurePascals / 100.0;
  
  display.clear();
  
  display.drawRect(0, 0, DISPLAY_WIDTH, DISPLAY_HEIGHT);
  
  display.setFont(ArialMT_Plain_16);
  display.drawString(35, 3, "BME280");
  
  display.setFont(ArialMT_Plain_10);
  display.drawString(5, 22, "Temperature = " + String(tempC) + " *C");
  display.drawString(5, 35, "Humidity = " + String(humidity) + "%");
  display.drawString(5, 48, "Pressure = " + String(pressureHectoPascals) + " h,Pa");
  
  display.display();
}

void printToSerial(float tempC, float humidity, float pressurePascals)
{
    // Temperature
    float tempF = 9.0/5.0 * tempC + 32.0;

    Serial.println("Temperature:");
    printValueAndUnits(tempC, "*C");
    printValueAndUnits(tempF, "*F");
    //printValueAndUnits(tempC, "°C");
    //printValueAndUnits(tempF, "°F");
    Serial.println("");

    // Barometric pressure
    float pressureHectoPascals = pressurePascals / 100.0;
    float pressureInchesOfMercury = 0.000295299830714 * pressurePascals;

    Serial.println("Pressure:");
    printValueAndUnits(pressurePascals, "Pa");
    printValueAndUnits(pressureHectoPascals, "hPa");
    printValueAndUnits(pressureInchesOfMercury, "inHg");
    Serial.println("");

    // Humidity
    Serial.println("Humidity:");
    printValueAndUnits(humidity, "%");
    Serial.println("");

    // Approximate altitude
    float altitudeMeters = bme.readAltitude(SEA_LEVEL_PRESSURE_HPA);
    float altitudeFeet = 3.28 * altitudeMeters;
    
    Serial.println("Approx. Altitude:");
    printValueAndUnits(altitudeMeters, "m");
    printValueAndUnits(altitudeFeet, "ft");
    Serial.println();
}

void printValueAndUnits(float value, String units)
{
    Serial.print("     ");
    Serial.print(value);
    Serial.print(" ");
    Serial.println(units);
}

This completes our attempt to display sensor data using hardware. Although we were successful, we did not use the WiFi capabilities of the ESP8266! That's what the next tutorial will be about!

Tuesday, March 28, 2017

NodeMCU and Digital Sensors

The goal for the next few tutorials is to read data from a digital sensor, then output that data in various fashions. We will finish this series by discussing the shortcomings common to all of these approaches, and this will set the direction for future work.

The sensor we'll be using is called a BME280, which returns temperature, humidity, and barometric pressure. Using sea level air pressure, the sensor also returns an approximate altitude, too. Adafruit has developed an Arduino library for this sensor, and we'll be using that library.

Instructions for installing the Arduino IDE and the baseline ESP8266 board can be found in the earlier "Getting Started with the NodeMCU ESP8266 Board" tutorial.


Installing the Libraries
First, we install the BME280 library into the Arduino IDE. Well, actually, there are two libraries to install:

  • Adafruit Unified Sensor Driver
  • Adafruit BME280

The Adafruit Unified Sensor Driver library is an abstraction layer that provides a unified interface for numerous types of sensors. One of the ways this interface "unifies" these sensors is that sensor values will always be returned in metric (SI) units. A list of those sensors and an explanation of why an abstraction layer is a good thing can be found at https://github.com/adafruit/Adafruit_Sensor.

The Adafruit BME280 library implements the methods in the first library for the BME280.

To install these libraries, open the Arduino IDE, and choose the menu Sketch | Include Library | Manage Libraries..., and the Library Manager window will open:

Enter "Adafruit Unified Sensor" into the search box, and scroll through the results until you find the row titled "Adafruit Unified Sensor" library. Click the row, and a version drop-down list and an "Install" button will be displayed. Choose the latest version (currently 1.0.5) and click the "Install" button.

Note: once the Adafruit Unified Sensor Driver library is installed, we need not install it again when we use other sensors that depend on it.

Now install the BME280 library itself: in the search box, enter "Adafruit BME280", select the latest version (1.0.5 as of this writing) and click "Install".

Done and done!


Connecting the Sensor Using I2C
The BME280 comes mounted on a number of different breakout boards from different vendors. We will use the (overpriced) version from SparkFun Electronics - other vendors sell far less expensive versions. The SparkFun breakout board includes connection points for both I2C and SPI interfaces, and we will be using the I2C interface, which has the following pins: GND, 3.3V, SDA, and SCL. Connect the sensor to the ESP8266 as follows:

Notice that we used NodeMCU's D2 pin for SDA and NodeMCU's D1 pin for SCL. Those are the default I2C pins for the NodeMCU.


Read From the Sensor
Enter the following sketch:

 1
 2
 3
 4
 5
 6
 7
 8
 9
10
11
12
13
14
15
16
17
18
19
20
21
22
23
24
25
26
27
28
29
30
31
32
33
34
35
36
37
38
39
40
41
42
43
44
45
46
47
48
49
50
51
52
53
54
55
56
57
58
59
60
61
62
63
64
65
66
67
68
69
70
71
72
73
74
75
76
77
78
79
80
81
82
83
84
85
86
87
88
89
90
91
92
93
94
95
/*
 * BME280
 * 
 * By: Mike Klepper
 * Date: 28 March 2017
 * 
 * The BME280 is a humidity + temperature + barometric pressure sensor.
 * This program reads those values from that sensor, converts the values into various units,
 * then displays the results in the Serial Monitor. It is based upon code found 
 * at learn.adafruit.com.
 *
 * Connections using the SparkFun breakout board:
 * BME280 GND --> NodeMCU GND
 * BME280 3.3V --> NodeMCU 3V3
 * BME280 SDA --> NodeMCU D2
 * BME280 SCL --> NodeMCU D1
 */

#include <Wire.h>
#include <Adafruit_Sensor.h>
#include <Adafruit_BME280.h>

const float SEA_LEVEL_PRESSURE_HPA = 1013.25;
const int DELAY = 2000;
const int STARTUP_DELAY = 500;

Adafruit_BME280 bme;

void setup() 
{
  Serial.begin(115200);
  Serial.println("BME280 Test");

  if(!bme.begin())
  {
    Serial.println("Could not find a valid BME280 sensor, check wiring!");
    while (1)
    {
        yield();
        delay(DELAY);
    }
  }
  delay(STARTUP_DELAY);
}

void loop() 
{
    // Temperature    
    float tempC = bme.readTemperature();
    float tempF = 9.0/5.0 * tempC + 32.0;

    Serial.println("Temperature:");
    printValueAndUnits(tempC, "*C");
    printValueAndUnits(tempF, "*F");
    Serial.println("");

    // Barometric pressure
    float pressurePascals = bme.readPressure();
    float pressureHectoPascals = pressurePascals / 100.0;
    float pressureInchesOfMercury = 0.000295299830714 * pressurePascals;

    Serial.println("Pressure:");
    printValueAndUnits(pressurePascals, "Pa");
    printValueAndUnits(pressureHectoPascals, "hPa");
    printValueAndUnits(pressureInchesOfMercury, "inHg");
    Serial.println("");

    // Humidity
    float humidity = bme.readHumidity();
    
    Serial.println("Humidity:");
    printValueAndUnits(humidity, "%");
    Serial.println("");

    // Approximate altitude
    float altitudeMeters = bme.readAltitude(SEA_LEVEL_PRESSURE_HPA);
    float altitudeFeet = 3.28 * altitudeMeters;
    
    Serial.println("Approx. Altitude:");
    printValueAndUnits(altitudeMeters, "m");
    printValueAndUnits(altitudeFeet, "ft");
    Serial.println();

    Serial.println();
    yield();
    delay(DELAY);
}

void printValueAndUnits(float value, String units)
{
    Serial.print("     ");
    Serial.print(value);
    Serial.print(" ");
    Serial.println(units);
}

Again, D2 and D1 are NodeMCU's default pins for SDA and SCL, respectively. Using a different ESP8266 board will entail specifying those pins in the code, as explained on the Adafruit site.

The code is self explanatory, except for the following:

Line 19 - Wire.h is Arduino's default library for communicating with I2C devices, like the BME280.
Line 23 - The value chosen for SEA_LEVEL_PRESSURE_HPA is the average air pressure at sea-level, measured in hectoPascals.

Save it, then choose "NodeMCU 1.0 (ESP-12E Module)" under Tools | Board and choose the right port under Tools | Port. Flash the code to the NodeMCU, and open the serial monitor once it has done uploading:

These results don't exactly match the results returned by the local weatherman, but they were taken while the sensor is in a (rather warm) public library.

Monday, March 27, 2017

MQTT - Persistent and Clean Sessions

The persistent session feature of MQTT allows the broker to save the following information about a client:

  1. All topics that it to which it subscribed, along with the QoS level for each
  2. All unconfirmed QoS 1 or 2 messages sent to those topic(s)
  3. All new QoS 1 or 2 messages sent to those topic(s) while the client is offline

Since we have been using mosquitto_sub, we are only able to subscribe to a single topic. In real applications, subscribing to multiple topics is a real possibility. Using a persistent session saves us from having to resubscribe when a client disconnects then reconnects. Having any missing QoS 1 or 2 messages resent is also a good thing!

When mosquitto_sub connects to a broker, by default it creates what is called a clean session, which means that the subscription(s) have to be created from scratch, and it doesn't get unconfirmed or new QoS 1 or 2 messages sent while the client was offline.

To create a persistent connection using mosquitto_sub we must:

  1. specify a client ID using the -i flag
  2. disable clean session by adding the -c flag
  3. use a QoS level of 1 or 2 using the -q flag.

When a client connects using a persistent connection, it is called a durable client.

To see how all this works, we create three windows:
Window #1: mosquitto -v
Window #2: mosquitto_sub -d -h localhost -i Subscriber1 -c -q 1 -t home/living-room/temperature

Because we used the -c flag, specified a clientID (Subscriber1), and set the QoS level to 1, the broker has created a persistent session for this client.

Now press CTRL-C in Window #2 to stop the subscriber.

Next, we publish some messages to the topic home/living-room/temperature in Window #3:

mosquitto_pub -d -h localhost -t home/living-room/temperature -q 1 -m "Message 1"
mosquitto_pub -d -h localhost -t home/living-room/temperature -q 2 -m "Message 2"
mosquitto_pub -d -h localhost -t home/living-room/temperature -q 1 -m "Message 3"

Now back in Window #2, we restart the client using the same command as above:

mosquitto_sub -d -h localhost -i Subscriber1 -c -t home/living-room/temperature

What we see is that Subscriber1 receives the three messages that it missed:

pi@raspberrypi:~ $ mosquitto_sub -d -h localhost -i Subscriber1 -c -q 1 -t home/living-room/temperature
Client Subscriber1 sending CONNECT
Client Subscriber1 received CONNACK
Client Subscriber1 sending SUBSCRIBE (Mid: 1, Topic: home/living-room/temperature, QoS: 1)
Client Subscriber1 received PUBLISH (d0, q1, r0, m4, 'home/living-room/temperature', ... (9 bytes))
Client Subscriber1 sending PUBACK (Mid: 4)
Message 1
Client Subscriber1 received PUBLISH (d0, q1, r0, m5, 'home/living-room/temperature', ... (9 bytes))
Client Subscriber1 sending PUBACK (Mid: 5)
Message 2
Client Subscriber1 received PUBLISH (d0, q1, r0, m6, 'home/living-room/temperature', ... (9 bytes))
Client Subscriber1 sending PUBACK (Mid: 6)
Message 3

Since Subscriber1 connected to the topic using QoS 1, "Message 2" (which was sent with QoS 2) will be received as QoS 1.

In all fairness, this is not a true test of persistent sessions, because mosquitto_sub requires that we specify a topic. Were we to use another client, we wouldn't have to resubscribe to that topic.

Note that this is the first real "queue" we have seen in MQTT.

By default, Mosquitto will save persistent session information in memory, not to disk. Further, the sessions NEVER expire by default. This can be changed by modifying mosquitto.conf.

MQTT - Message Retention

So far we have discussed message payload, topic, and QoS. Another property of messages is retention.

When a message is marked for retention (using the -r flag in mosquitto_pub) and sent to a topic, the broker retains that message and the QoS for that topic. When a client then subscribes to that topic, the broker will send that message right away to the new client. The client can then receive the last known value of that topic, instead of waiting for the publisher to publish to that topic.

In summary: MQTT message retention is for when subscribers come late to the party!

Here's how to see this in action using three Terminal windows:

Window #1: mosquitto -v
Window #2: mosquitto_pub -d -h localhost -t home/living-room/temperature -r -m "Living room temperature"

Now, the publishing client has sent a retained message (because of the -r flag) then disconnected. When we subscribe to that same topic:

Window #3: mosquitto_sub -d -h localhost -t home/living-room/temperature
the client receives the "Living room temperature" message even though the publisher has already disconnected!

To change the retained message, just send another retained message on the same topic:

Window #2: mosquitto_pub -d -h localhost -t home/living-room/temperature -r -m "New temperature"

Note: sending a non-retained message will NOT change the retained message.

To delete the retained message, just send a retained message with zero length:

Window #2: mosquitto_pub -d -h localhost -t home/living-room/temperature -r -m ""
After that, new subscribers to that topic will NOT receive a retained message.

Sunday, March 26, 2017

MQTT - Last Will and Testament

MQTT is designed for situations with less-than-perfect networks and finicky clients, so there should be a way to send a notification when a client abruptly disconnects. This is what the Last Will and Testament (LWT) feature is all about.

What do we mean by an abrupt or unexpected disconnection? This is when the client disconnects without sending the DISCONNECT command message. For example, if the clients are battery-operated sensors, a sensor would abruptly disconnect when the battery dies.

When a client connects to a broker, there is the option to specify that a message be sent to a specific topic when that client ungracefully disconnects. Using mosquitto_pub and mosquitto_sub, the LWT message is set with the flag --will-payload, and the topic to which it will be sent is specified with the --will-topic flag. It is also possible to specify the QoS level of the message when it gets sent to the LWT topic. This is controlled with the --will-qos flag, which defaults to QoS 0.

Suppose a client connects to the broker and specifies a LWT topic and message (payload). Should that client unexpectedly go offline, then the LWT message is published to the LWT topic by the broker. The client cannot send that message since it has disconnected!

If the client does indeed send a DISCONNECT message, the broker will close the connection and discard that client's LWT message and will not send a message to the LWT topic.

Here is a good way to use LWT:

  1. Create a special client that is subscribed to a topic named like "home/sensor-problems".
  2. All new clients, when they connect to the broker, specify "home/sensor-problems" as their LWT topic, and set the LWT to be that client's ID.
  3. By monitoring the "home/sensor-problems" topic, we will be alerted to when a sensor has problems.

We can test LWT by opening four Terminal windows and run the following commands:

Window #1: mosquitto -v
Window #2: mosquitto_sub -d -h localhost -t home/sensor-problems
Window #3: mosquitto_sub -d -i Subscriber123 -h localhost -t home/living-room/temperature --will-topic home/sensor-problems --will-payload "Problem with Subscriber123"

Then press Control-C to stop the client running in Window #3. This will generate an unexpected disconnection, and the message "Problem with Subscriber123" will be published to the client running in Window #2.

Saturday, March 25, 2017

MQTT - Topics and Wildcards

Topics are what MQTT uses to organize what can be a considerable amount of incoming data. Publishers must publish to a topic, and subscribers must subscribe to a topic. As we saw in the last tutorial, there is no need for a client to create a topic before subscribing to it or publishing to it.

As we'll see, there are four specific characters of importance to MQTT topics:

  • / - topic level separator
  • + - single level wildcard
  • # - multi-level wildcard
  • $ - reserved for system usage.

Topics can contain wildcards, the "+" and "#" characters. It is not possible to publish to a topic containing a wildcard, it is only possible to subscribe to such a topic.

This tutorial covers the following, ahem, topics:

  1. Topic Levels
  2. Single Level Wildcards
  3. Multi-Level Wildcards
  4. SYS Topics
  5. Best Practices


Topic Levels
Topics are case-sensitive, so the following two topics are distinct:

  • home/living-room/temperature
  • home/living-room/Temperature
meaning that a message published to home/living-room/temperature will not be sent to a client subscribed to home/living-room/Temperature.

An easy way of testing this is to open four Terminal windows and issue the following commands:

Window #1: mosquitto -v
Window #2: mosquitto_sub -d -h localhost -t home/living-room/temperature
Window #3: mosquitto_sub -d -h localhost -t home/living-room/Temperature
Window #4: mosquitto_pub -d -h localhost -t home/living-room/temperature -m "Living room temperature"
The message sent in the fourth window will only be displayed in the second window.

MQTT topic levels can be the empty string. For this reason, the following are all valid topics:

  • /b/c/d
  • a//c/d
  • a/b/c/
In each, there are four levels. For example, in the topic /b/c/d, the empty string before the "/" is a topic level.

Because empty-string topic levels are acceptable, the following two topics are distinct:

  • home/living-room/temperature
  • /home/living-room/temperature


Single Level Wildcards

A single level wildcard (+) matches exactly one level. So, the following are all matched by "home/+/temperature":

  • home/living-room/temperature
  • home/kitchen/temperature
  • home/bedroom/temperature
  • home//temperature
whereas the following are not matched by "home/+/temperature":
  • home/living-room/temperature/degrees-fahrenheit
  • /home/living-room/temperature
  • home/first-floor/living-room/temperature

Also, "home/living-room/+" matches the following:

  • home/living-room/temperature
  • home/living-room/humidity
  • home/living-room/barometric-pressure
  • home/living-room/

Topics that contain more than one single level wildcards are OK. For example, "home/+/+" matches:

  • home/living-room/
  • home/living-room/humidity
  • home//

Finally, single level wildcard can be used at the start, and "+/first-floor/temperature" matches:

  • home/first-floor/temperature
  • building/first-floor/temperature


Multi-Level Wildcards
Unlike a single level wildcard, a multi-level wildcard (#) matches multiple levels. They can only be used at the end of a topic.

For example, "home/living-room/#" matches the following:

  • home/living-room/temperature
  • home/living-room/temperature/degrees-fahrenheit
but it does not match:
  • home/kitchen/temperature
  • home/first-floor/living-room/temperature

These two types of wildcards can be mixed. For example, "home/+/#" matches:

  • home/first-floor/temperature
  • home/first-floor/temperature/degrees-fahrenheit
  • home/first-floor//degrees-fahrenheit
  • home/first-floor//
  • home/first-floor///
  • home/first-floor///temperature

To reiterate, it is not possible to publish to a topic containing a wildcard, it is only possible to subscribe to such a topic.


SYS Topics
Topics that start with "$" are called "SYS topics". These are used by the broker to report various pieces of information about the broker, such as the number of messages sent, the uptime, etc. It is only possible to subscribe to such a topic. Also, messages sent to SYS topics are not captured when subscribed to '#'.

Here are some examples:

  • $SYS/broker/uptime
  • $SYS/broker/messages/sent - this includes PINGRESP as well as messages sent on other SYS-topics.

There is no standard describing what SYS topics must be supported by a broker, but a list of commonly supported SYS topics can be found at https://github.com/mqtt/mqtt.github.io/wiki/SYS-Topics

To subscribe to SYS topics, the topic must be surrounded by quotes. For example:
mosquitto_sub -d -v -h localhost -t '$SYS/broker/uptime'


Best Practices

  • The topic is included in each message, so it is best to keep topics as short as possible. This means that the name of each topic should be short, and the number of levels should be kept small.
  • Avoid empty-string topics
  • Using wildcards to subscribe to topics that are "high volume" will put undo load on that client.
  • Avoid starting topics with "/"
  • Keep the topics focused, so that only one type of value should be published to a topic. So, having three separate topics:
    • home/living-room/temperature
    • home/living-room/humidity
    • home/living-room/barometric-pressure
    with appropriate values published to each is preferable to using a single topic like
    • home/living-room
    and publishing temperatures, humidity levels, and air pressures to that one topic
  • Design topic hierarchy with extensibility in mind. For example, it is more likely that you would add an additional sensor to your living room than it is to add a new room to your house! So, it makes more sense to use a hierarchy like this:
    • home/living-room/temperature
    than it does to do this:
    • home/temperature/living-room
  • Include a client ID in the topic when it makes sense to do so.

Friday, March 24, 2017

MQTT - Connections and QoS Levels

The last tutorial explained that MQTT clients connect to a broker, and these clients can publish messages to the broker or receive messages from a broker. Clients can be both publishers and recipients of messages. To organize messages, clients must send messages to a topic, such as "home/living-room/temperature", and clients must subscribe to that same topic if they are to receive those messages. The broker's job is to route messages from publishers to subscribers, making sure that subscribers only receive messages on the desired topic.

This tutorial covers:

  1. Connections, subscriptions, and the keep alive "heartbeat"
  2. Publication and QoS levels
  3. Downgraded QoS Levels
  4. How to choose between the QoS levels

To get a detailed understanding of the lifecycle of a MQTT connection and a message publication, we will perform variants of an experiment we performed in the last tutorial.


Connections, Subscriptions, and "Heartbeat"
For this experiment, we will need two Terminal windows:

Window #1 will be running the Mosquitto broker, started with this command:
mosquitto -v

The -v flag tells the broker to be verbose in output.

Window #2 will be running a subscribing client. After Mosquitto has started, enter the following command in the second window:
mosquitto_sub -d -h localhost -i Subscriber1 -t home/living-room/temperature

Here's an explanation of the flags used when starting the mosquitto_sub client:

  • -d debug
  • -h hostname (in this case, localhost)
  • -i client ID (Subscriber1)
  • -t topic (home/living-room/temperature)

Leave these running for a few minutes, then press CTRL-C in Window #2 to stop the subscribing client.

The broker window will display something like the following:

pi@raspberrypi:~ $ mosquitto -v
1490306591: mosquitto version 1.4.10 (build date 2017-02-19 02:05:51+0000) starting
1490306591: Using default config.
1490306591: Opening ipv6 listen socket on port 1883.
1490306591: Opening ipv4 listen socket on port 1883.
1490306760: New connection from ::1 on port 1883.
1490306760: New client connected from ::1 as Subscriber1 (c1, k60).
1490306760: Sending CONNACK to Subscriber1 (0, 0)
1490306760: Received SUBSCRIBE from Subscriber1
1490306760:  home/living-room/temperature (QoS 0)
1490306760: Subscriber1 0 home/living-room/temperature
1490306760: Sending SUBACK to Subscriber1
1490306820: Received PINGREQ from Subscriber1
1490306820: Sending PINGRESP to Subscriber1
1490306880: Received PINGREQ from Subscriber1
1490306880: Sending PINGRESP to Subscriber1
1490306896: Socket error on client Subscriber1, disconnecting.

Meanwhile in Window #2, we see the following:

pi@raspberrypi:~ $ mosquitto_sub -d -h localhost -i Subscriber1 -t home/living-room/temperature
Client Subscriber1 sending CONNECT
Client Subscriber1 received CONNACK
Client Subscriber1 sending SUBSCRIBE (Mid: 1, Topic: home/living-room/temperature, QoS: 0)
Client Subscriber1 received SUBACK
Subscribed (mid: 1): 0
Client Subscriber1 sending PINGREQ
Client Subscriber1 received PINGRESP
Client Subscriber1 sending PINGREQ
Client Subscriber1 received PINGRESP
^C

The communication back and forth is in the form of a series of "command messages".

When mosquitto_sub is started, it first sends a CONNECT command message to the broker. The broker responds with a CONNACK message to acknowledge that it has indeed connected to the client. Next, the client sends a SUBSCRIBE message, along with the topic. The broker responds with SUBACK.

And that's how a client connects to a broker!

After the connection is established, the client periodically sends pings to the broker to ensure that the broker hasn't crashed. The client sends PINGREQ, and the broker sends-back PINGRESP. This is MQTT's "keep alive" functionality, essentially a MQTT "heartbeat".

The entire process can be shown as follows, with the vertical axis representing time, increasing as we read from top to bottom:

In summary, we have seen the following command messages being exchanged:

CONNECT - client requests a connection to the broker
CONNACK - broker acknowledges that the connection was either accepted or refused
SUBSCRIBE - subscribe to a topic (subscribe messages use QoS 1)
SUBACK - subscription acknowledgement
PINGREQ - the client is asking if the broker is alive
PINGRESP - the broker sends a PINGRESP message back to the client indicating that the broker is indeed alive

There are three additional command messages that can be seen when unsubscribing or disconnecting. Unfortunately, there does not seem to be a way to get mosquitto_sub to generate these messages:

UNSUBSCRIBE - client tells the broker that it wants to unsubscribe from a topic
UNSUBACK - broker acknowledges receipt of the UNSUBSCRIBE message
DISCONNECT - the client sends this to the broker when it is about to close the TCP/IP connection.


Publication and QoS Levels
In the last tutorial, we discussed the Quality of Service (QoS) levels. Each QoS level is an agreement between sender and receiver guaranteeing receipt of the message. There are three of them, and can be roughly described as follows:

QoS 0 - message is received at most once
QoS 1 - message is received at least once
QoS 2 - message is received exactly once

Each connection from client to broker or broker to client can have its own QoS. Thus, it is possible for connections to have different QoS levels. Let us first look at the situation where the QoS levels are the same going from publisher to broker and from broker to subscriber.

For QoS 1 and QoS 2, there is a confirmation in addition to publishing data (two steps for QoS 1 and four steps for QoS 2). The sender and/or the recipient must retain the data until this confirmation is complete.

To investigate the process of sending and receiving messages, we will set-up three Terminal windows: one for the broker, one for the subscribed client, and one for the publishing client.

QoS 0 is "fire and forget". Let's try an experiment, running these commands in three separate windows in the following order:
Window 1: mosquitto -v
Window 2: mosquitto_sub -d -h localhost -i Subscriber1 -t home/living-room/temperature
Window 3: mosquitto_pub -d -h localhost -i Publisher1 -t home/living-room/temperature -m "Hello, QoS 0"

There is one additional flag in the last command:

  • -m is the message to be sent

The clients mosquitto_sub and mosquitto_pub default to QoS 0, so there is no need to specify that in the command line.

Window 1:

pi@raspberrypi:~ $ mosquitto -v
1490312451: mosquitto version 1.4.10 (build date 2017-02-19 02:05:51+0000) starting
1490312451: Using default config.
1490312451: Opening ipv6 listen socket on port 1883.
1490312451: Opening ipv4 listen socket on port 1883.
1490312454: New connection from ::1 on port 1883.
1490312454: New client connected from ::1 as Subscriber1 (c1, k60).
1490312454: Sending CONNACK to Subscriber1 (0, 0)
1490312454: Received SUBSCRIBE from Subscriber1
1490312454:  home/living-room/temperature (QoS 0)
1490312454: Subscriber1 0 home/living-room/temperature
1490312454: Sending SUBACK to Subscriber1
1490312459: New connection from ::1 on port 1883.
1490312459: New client connected from ::1 as Publisher1 (c1, k60).
1490312459: Sending CONNACK to Publisher1 (0, 0)
1490312459: Received PUBLISH from Publisher1 (d0, q0, r0, m0, 'home/living-room/temperature', ... (12 bytes))
1490312459: Socket error on client Publisher1, disconnecting.
1490312459: Sending PUBLISH to Subscriber1 (d0, q0, r0, m0, 'home/living-room/temperature', ... (12 bytes))
1490312514: Received PINGREQ from Subscriber1
1490312514: Sending PINGRESP to Subscriber1
1490312574: Received PINGREQ from Subscriber1
1490312574: Sending PINGRESP to Subscriber1

Window 2:

pi@raspberrypi:~ $ mosquitto_sub -d -h localhost -i Subscriber1 -t home/living-room/temperature
Client Subscriber1 sending CONNECT
Client Subscriber1 received CONNACK
Client Subscriber1 sending SUBSCRIBE (Mid: 1, Topic: home/living-room/temperature, QoS: 0)
Client Subscriber1 received SUBACK
Subscribed (mid: 1): 0
Client Subscriber1 received PUBLISH (d0, q0, r0, m0, 'home/living-room/temperature', ... (12 bytes))
Hello, QoS 0
Client Subscriber1 sending PINGREQ
Client Subscriber1 received PINGRESP
Client Subscriber1 sending PINGREQ
Client Subscriber1 received PINGRESP

Window 3:

pi@raspberrypi:~ $ mosquitto_pub -d -h localhost -i Publisher1 -t home/living-room/temperature -m "Hello, QoS 0"
Client Publisher1 sending CONNECT
Client Publisher1 received CONNACK
Client Publisher1 sending PUBLISH (d0, q0, r0, m1, 'home/living-room/temperature', ... (12 bytes))
Client Publisher1 sending DISCONNECT
pi@raspberrypi:~ $ 

The publisher first sends the CONNECT command message, then receives CONNACK. Next, it sends a PUBLISH command message, and then it sends DISCONNECT message. Here's what the procell looks like, focusing on just the PUBLISH messages.

The broker receives the PUBLISH message, then sends the PUBLISH message on to the subscriber.

Once the sender (either Publisher1 or the broker) sends the message, there is no reason to retain it. Truly, QoS 0 is fire and forget!

Now let us try a QoS 1 message...
Window 1: mosquitto -v
Window 2: mosquitto_sub -d -h localhost -q 1 -i Subscriber1 -t home/living-room/temperature
Window 3: mosquitto_pub -d -h localhost -q 1 -i Publisher1 -t home/living-room/temperature -m "Hello, QoS 1"

There is an additional flag in the last two commands:

  • -q is the QoS level

Window 1:

pi@raspberrypi:~ $ mosquitto -v
1490312729: mosquitto version 1.4.10 (build date 2017-02-19 02:05:51+0000) starting
1490312729: Using default config.
1490312729: Opening ipv6 listen socket on port 1883.
1490312729: Opening ipv4 listen socket on port 1883.
1490312742: New connection from ::1 on port 1883.
1490312742: New client connected from ::1 as Subscriber1 (c1, k60).
1490312742: Sending CONNACK to Subscriber1 (0, 0)
1490312742: Received SUBSCRIBE from Subscriber1
1490312742:  home/living-room/temperature (QoS 1)
1490312742: Subscriber1 1 home/living-room/temperature
1490312742: Sending SUBACK to Subscriber1
1490312760: New connection from ::1 on port 1883.
1490312760: New client connected from ::1 as Publisher1 (c1, k60).
1490312760: Sending CONNACK to Publisher1 (0, 0)
1490312760: Received PUBLISH from Publisher1 (d0, q1, r0, m1, 'home/living-room/temperature', ... (12 bytes))
1490312760: Sending PUBACK to Publisher1 (Mid: 1)
1490312760: Sending PUBLISH to Subscriber1 (d0, q1, r0, m1, 'home/living-room/temperature', ... (12 bytes))
1490312760: Received PUBACK from Subscriber1 (Mid: 1)
1490312760: Received DISCONNECT from Publisher1
1490312760: Client Publisher1 disconnected.
1490312820: Received PINGREQ from Subscriber1
1490312820: Sending PINGRESP to Subscriber1

Window 2:

pi@raspberrypi:~ $ mosquitto_sub -d -h localhost -q 1 -i Subscriber1 -t home/living-room/temperature
Client Subscriber1 sending CONNECT
Client Subscriber1 received CONNACK
Client Subscriber1 sending SUBSCRIBE (Mid: 1, Topic: home/living-room/temperature, QoS: 1)
Client Subscriber1 received SUBACK
Subscribed (mid: 1): 1
Client Subscriber1 received PUBLISH (d0, q1, r0, m1, 'home/living-room/temperature', ... (12 bytes))
Client Subscriber1 sending PUBACK (Mid: 1)
Hello, QoS 1
Client Subscriber1 sending PINGREQ
Client Subscriber1 received PINGRESP

Window 3:

pi@raspberrypi:~ $ mosquitto_pub -d -h localhost -q 1 -i Publisher1 -t home/living-room/temperature -m "Hello, QoS 1"
Client Publisher1 sending CONNECT
Client Publisher1 received CONNACK
Client Publisher1 sending PUBLISH (d0, q1, r0, m1, 'home/living-room/temperature', ... (12 bytes))
Client Publisher1 received PUBACK (Mid: 1)
Client Publisher1 sending DISCONNECT

Publisher1 sends a PUBLISH message. The broker receives the message, then sends a PUBACK message to Publisher1. Publisher1 receives the PUBACK message, letting Publisher1 know that the recipient (broker) has received the message. The exact same thing happens when the message is sent from the broker to Subscriber1.

The sender of the message (either Publisher1 -- QoS 1 --> Broker or Broker -- QoS 1 --> Subscriber1) must retain the message until the PUBACK message is received. So, when Publisher1 receives PUBACK, it is safe to delete the message.

How does the sender know how to match PUBLISH and PUBACK commands? Each message has a packet identifier, so the sender knows when to delete a message when the packet ID of the PUBLISH message matches the packet ID of the PUBACK message.

Finally, let's see the steps involved in QoS 2 messages
Window 1: mosquitto -v
Window 2: mosquitto_sub -d -h localhost -q 2 -i Subscriber1 -t home/living-room/temperature
Window 3: mosquitto_pub -d -h localhost -q 2 -i Publisher1 -t home/living-room/temperature -m "Hello, QoS 2"

Window 1:

pi@raspberrypi:~ $ mosquitto -v
1490312914: mosquitto version 1.4.10 (build date 2017-02-19 02:05:51+0000) starting
1490312914: Using default config.
1490312914: Opening ipv6 listen socket on port 1883.
1490312914: Opening ipv4 listen socket on port 1883.
1490312927: New connection from ::1 on port 1883.
1490312927: New client connected from ::1 as Subscriber1 (c1, k60).
1490312927: Sending CONNACK to Subscriber1 (0, 0)
1490312927: Received SUBSCRIBE from Subscriber1
1490312927:  home/living-room/temperature (QoS 2)
1490312927: Subscriber1 2 home/living-room/temperature
1490312927: Sending SUBACK to Subscriber1
1490312955: New connection from ::1 on port 1883.
1490312955: New client connected from ::1 as Publisher1 (c1, k60).
1490312955: Sending CONNACK to Publisher1 (0, 0)
1490312955: Received PUBLISH from Publisher1 (d0, q2, r0, m1, 'home/living-room/temperature', ... (12 bytes))
1490312955: Sending PUBREC to Publisher1 (Mid: 1)
1490312955: Received PUBREL from Publisher1 (Mid: 1)
1490312955: Sending PUBCOMP to Publisher1 (Mid: 1)
1490312955: Sending PUBLISH to Subscriber1 (d0, q2, r0, m1, 'home/living-room/temperature', ... (12 bytes))
1490312955: Received DISCONNECT from Publisher1
1490312955: Client Publisher1 disconnected.
1490312955: Received PUBREC from Subscriber1 (Mid: 1)
1490312955: Sending PUBREL to Subscriber1 (Mid: 1)
1490312955: Received PUBCOMP from Subscriber1 (Mid: 1)
1490313015: Received PINGREQ from Subscriber1
1490313015: Sending PINGRESP to Subscriber1

Window 2:

pi@raspberrypi:~ $ mosquitto_sub -d -h localhost -q 2 -i Subscriber1 -t home/living-room/temperature
Client Subscriber1 sending CONNECT
Client Subscriber1 received CONNACK
Client Subscriber1 sending SUBSCRIBE (Mid: 1, Topic: home/living-room/temperature, QoS: 2)
Client Subscriber1 received SUBACK
Subscribed (mid: 1): 2
Client Subscriber1 received PUBLISH (d0, q2, r0, m1, 'home/living-room/temperature', ... (12 bytes))
Client Subscriber1 sending PUBREC (Mid: 1)
Client Subscriber1 received PUBREL (Mid: 1)
Hello, QoS 2
Client Subscriber1 sending PUBCOMP (Mid: 1)
Client Subscriber1 sending PINGREQ
Client Subscriber1 received PINGRESP

Window 3:

pi@raspberrypi:~ $ mosquitto_pub -d -h localhost -q 2 -i Publisher1 -t home/living-room/temperature -m "Hello, QoS 2"
Client Publisher1 sending CONNECT
Client Publisher1 received CONNACK
Client Publisher1 sending PUBLISH (d0, q2, r0, m1, 'home/living-room/temperature', ... (12 bytes))
Client Publisher1 received PUBREC (Mid: 1)
Client Publisher1 sending PUBREL (Mid: 1)
Client Publisher1 received PUBCOMP (Mid: 1)
Client Publisher1 sending DISCONNECT

In QoS 2, publication and confirmation is a four step process. Publisher1 sends the PUBLISH message to the broker, which then sends PUBREC message back. Publisher1 receives PUBREC, and responds with PUBREL. The broker receives that PUBREL, and responds with PUBCOMP. Publisher1 receives PUBCOMP, thus ending the publish and confirmation process. The exact process is repeated when the message is sent from broker to Subscriber1.

Here is a complete list of the command messages involved in publishing messages under the various QoS levels:

PUBLISH - sent by a publisher when it publishes a message
PUBACK - sent in response to a PUBLISH message with QoS level 1
PUBREC - sent in response to a PUBLISH message with QoS level 2. This is the second message in QoS 2 protocol flow.
PUBREL - assured publish release, sent in response to a PUBREC message. Third message in the QoS 2 protocol flow
PUBCOMP - assured publish complete. Sent in response to a PUBREL message. It is the fourth and last message in the QoS 2 protocol flow.

This gives us the steps involved in sending the messages with each of the QoS levels.


Downgraded QoS Levels
As mentioned above, it is possible for the publishing client and the subscribed client connect to the broker with different QoS levels. For example, suppose Publisher1 - QoS 2 -> Broker, and Broker - QoS 0 -> Subscriber1. In that case, the QoS is said to be downgraded, meaning that a message sent to the broker in QoS 2 will then be sent to Subscriber1 as QoS 0.

Let's try an example of that:
Window 1: mosquitto -v
Window 2: mosquitto_sub -d -h localhost -q 0 -i Subscriber1 -t home/living-room/temperature
Window 3: mosquitto_pub -d -h localhost -q 2 -i Publisher1 -t home/living-room/temperature -m "Hello, mixed QoS level"

Window #1:

mosquitto -v
1490369141: mosquitto version 1.4.10 (build date 2017-02-19 02:05:51+0000) starting
1490369141: Using default config.
1490369141: Opening ipv6 listen socket on port 1883.
1490369141: Opening ipv4 listen socket on port 1883.
1490369167: New connection from ::1 on port 1883.
1490369167: New client connected from ::1 as Subscriber1 (c1, k60).
1490369167: Sending CONNACK to Subscriber1 (0, 0)
1490369167: Received SUBSCRIBE from Subscriber1
1490369167:  home/living-room/temperature (QoS 0)
1490369167: Subscriber1 0 home/living-room/temperature
1490369167: Sending SUBACK to Subscriber1
1490369201: New connection from ::1 on port 1883.
1490369201: New client connected from ::1 as Publisher1 (c1, k60).
1490369201: Sending CONNACK to Publisher1 (0, 0)
1490369201: Received PUBLISH from Publisher1 (d0, q2, r0, m1, 'home/living-room/temperature', ... (22 bytes))
1490369201: Sending PUBREC to Publisher1 (Mid: 1)
1490369201: Received PUBREL from Publisher1 (Mid: 1)
1490369201: Sending PUBCOMP to Publisher1 (Mid: 1)
1490369201: Sending PUBLISH to Subscriber1 (d0, q0, r0, m0, 'home/living-room/temperature', ... (22 bytes))
1490369201: Received DISCONNECT from Publisher1
1490369201: Client Publisher1 disconnected.
1490369226: Received PINGREQ from Subscriber1
1490369226: Sending PINGRESP to Subscriber1

Window #2:

mosquitto_sub -d -h localhost -q 0 -i Subscriber1 -t home/living-room/temperature
Client Subscriber1 sending CONNECT
Client Subscriber1 received CONNACK
Client Subscriber1 sending SUBSCRIBE (Mid: 1, Topic: home/living-room/temperature, QoS: 0)
Client Subscriber1 received SUBACK
Subscribed (mid: 1): 0
Client Subscriber1 received PUBLISH (d0, q0, r0, m0, 'home/living-room/temperature', ... (22 bytes))
Hello, mixed QoS level
Client Subscriber1 sending PINGREQ
Client Subscriber1 received PINGRESP

Window #3:

mosquitto_pub -d -h localhost -q 2 -i Publisher1 -t home/living-room/temperature -m "Hello, mixed QoS level"
Client Publisher1 sending CONNECT
Client Publisher1 received CONNACK
Client Publisher1 sending PUBLISH (d0, q2, r0, m1, 'home/living-room/temperature', ... (22 bytes))
Client Publisher1 received PUBREC (Mid: 1)
Client Publisher1 sending PUBREL (Mid: 1)
Client Publisher1 received PUBCOMP (Mid: 1)
Client Publisher1 sending DISCONNECT

As can be seen, Publisher1 and the broker exchange the following command messages: PUBLISH, PUBREC, PUBREL, PUBCOMP since they are connected using QoS 2.

Then, the broker sends PUBLISH to Subscriber1, and Subscriber1 doesn't send a response (nor is broker expecting a response). This is because they are connected using QoS 0. This is how the QoS level is downgraded.


Choosing Between QoS Levels
Here are some notes on when to choose each QoS level:

Use QoS 0 when:

  • The connection between sender and receiver is very stable
  • Occasional data loss is acceptable

Use QoS 1 when:

  • Every message must be received
  • Recipient of these messages can handle duplicates - either because there is special-purpose code to detect duplicates, or the operations performed by each message are idempotent

Use QoS 2 when:

  • All messages must be received exactly once
  • The extra time needed to perform the 4-step publish and confirm process is acceptable

Monday, March 20, 2017

MQTT - First Steps

The goals for this tutorial are as follows:

  1. Discuss the history and purpose of MQTT
  2. Introduce the concepts of MQTT topics and quality of service (QoS)
  3. Install MQTT broker and client software on a Raspberry Pi
  4. Send some messages!
  5. Shutdown the MQTT broker


History and Purpose of MQTT
Andy Stanford-Clark (of IBM) and Arlen Nipper (of Arcom, now Cirrus Link) in 1999 were working on a SCADA (supervisory control and data acquisition) system for oil and gas pipelines. This system involved large numbers of low power sensors remotely distributed, and they needed to gather information from all those sensors. Since network bandwidth was at a premium, the sensors had to be very bandwidth efficient, which means the messages they sent had to be very short. Also, the network and sensors could be unreliable, so their SCADA system had to recognize and respond to those types of faults.

MQTT - which originally was an acronym for Message Queue Telemetry Transport - was the protocol they developed in solution to their problem.

Stanford-Clark and Nipper's original use-case closely parallels what is now called IoT: they had to gather data from a large number of sensors, sensors that are underpowered both in terms of power supply and computational ability, sensors that send data across what could be an unreliable network. This is one of the reasons MQTT has been adopted as a messaging protocol in IoT.

MQTT is a publish/subscribe architecture, and can be viewed as follows:

This system consists of two types of items: brokers and clients. The broker's job is to receive and redirect messages that are sent by the clients. Clients send messages to the broker as well as listen for messages from other clients routed through the broker. An example of a simple client is the ESP8266 temperature sensor we built previously! An example of a not-so-simple client is an application that listens for messages from the broker, and save those messages to a database.


MQTT Topics
The potentially large number of clients and the number of messages they can send requires that there be some way of organizing these messages. For this purpose, MQTT uses "topics".

Here's an example of a topic: suppose that there is a temperature sensor located in your living room. This sensor can send temperature readings every 60 seconds to a MQTT topic, and a good name for that topic would be "home/living-room/temperature". An application that saves those readings to a database would listen to the same topic.

There are several activities that clients must be able to do in an MQTT system:

  • Clients connect to brokers over TCP/IP
  • Clients disconnect from brokers
  • Clients subscribe to a topic, meaning they receive messages on that topic
  • Clients unsubscribe from a topic
  • Clients publish messages to a topic

Several clients can subscribe to the same topic, so that when a message is published to that topic, that message is broadcast by the broker to all the subscribers.


Quality of Service (QoS)
As mentioned above, MQTT is designed for messaging among low-powered devices in less-than-perfect networks. So, when a client publishes a message, it may not reach the broker, and the message may not be received by the subscribers. There are three types of guarantees that can be made about reliability. These are called levels of Quality of Service (QoS):

QoS 0
the message will be delivered at most once (either by client or by broker), but with no acknowledgement or confirmation. This is "fire and forget". The message is not retained, and may indeed be lost if the client disconnect or the broker fails.
QoS 1
the message will be delivered at least once to the receiver, but it could be delivered more than once. A confirmation message must be sent. The message must be stored locally at the sender until confirmation of receipt is received.
QoS 2
each message will be delivered exactly once, and all this is confirmed using a four-step process. The message must be stored locally at both the sender and the receiver until the confirmation process is complete.

Thus, higher levels of QoS are more reliable, but this reliability comes at the cost of higher bandwidth, latency, and additional local storage.


Installing MQTT on a RaspPi
There are several different MQTT brokers available. For our projects, we will be using the Mosquitto MQTT broker - notice the non-standard spelling here. We will install Mosquitto on a Raspberry Pi. The RasPi is not a serious choice for commercial production work, but will be sufficient for home and experimental use.

First, we make sure that Raspian is up to date:

sudo apt-get update
sudo apt-get dist-upgrade

Now we will install the Mosquitto MQTT broker, a MQTT client, and the Python bindings for Mosquitto. We will not be using Python in this tutorial.

sudo apt-get install mosquitto mosquitto-clients python-mosquitto


Sending Messages
MQTT is "message agnostic" - it doesn't care about how the messages are formatted. The messages can be formatted as JSON or XML, or not formatted in any way!

To start the broker running in the foreground (meaning in the current Terminal window), we will use the following command:

mosquitto -v
The '-v' flag is for verbose mode - all connection and messaging events will be shown!

Now that Mosquitto is running, we open three more Terminal windows.

In the first and second new windows, we issue the following command:

mosquitto_sub -d -h localhost -t home/living-room/temperature
This command starts a client and subscribes it to the topic home/living-room/temperature. All that this client will do is listen for messages sent to that topic and display them in the terminal window.
  • -d means that debug messages should be shown
  • -h is the host (which will be localhost)
  • -t is the topic this client will be subscribing to (in this case home/living-room/temperature)

In the third new window, we publish a message as follows:

mosquitto_pub -d -h localhost -t home/living-room/temperature -m 'Hello, MQTT!'

And the message 'Hello, MQTT!' will be displayed in the other two windows. Also, in the window we used to start MQTT there will be a description of what just happened.

Congrats, you just sent your first message using MQTT!

To get help about the Mosquitto broker or the subscriber or publisher clients, use the following commands:

mosquitto -h
mosquitto_sub --help
mosquitto_pub --help


Stopping MQTT
To stop the broker or the subscriber when they are running in foreground mode, just press Control-C.

To stop the broker when it is running in background mode, try the following command:
sudo /etc/init.d/mosquitto stop
If that doesn't work, one can get the PID of Mosquitto:
ps aux | grep mosquitto
and then kill the associated PID.

Thursday, March 16, 2017

Raspberry Pi Remote Access

In this (exhaustive) step-by-step tutorial we will set-up a Raspberry Pi for remote access. This is done on the new Raspberry Pi Zero W, but the steps will be the same for a Pi 3 or any earlier Pi that has a WiFi dongle attached.

We will first set-up the Pi using a monitor, keyboard, and mouse. We next configure and test the software used to remotely connect to the Pi. Finally, we unplug the Pi's monitor, keyboard, and mouse.

Hardware requirements:

  • Raspberry Pi Zero W
  • Power supply with micro USB connector
  • Micro SD card, class 10, at least 8 GB, but preferably 16 GB
  • Nice to have: a sassy and protective case for the Pi Zero W - cases for the Zero 1.3 with camera connector seem to work OK

Hardware used to temporarily connect with the Pi until remote access is ready:

  • Mini HDMI to standard HDMI adapter
  • HDMI cable
  • Monitor with HDMI port
  • USB hub
  • USB OTG micro B to A cable
  • USB keyboard and mouse (Logitech wireless works well)

Software requirements:

We first need the latest version of Raspian (the Raspberry Pi Foundation's official Linux distro). Download it from raspberrypi.org. As of this writing, the latest version of Raspian is called "Raspian Jesse with Pixel". "Jesse" is the Raspian version, and "Pixel" is the name for the Pi's new desktop interface.

Once download is complete, unzip the file by right-clicking on it and choosing "Extract...".

Next, put the micro SD card into your computer's card slot, and use Win32 Disk Imager to burn the Raspian image onto that SD card.

Once that is complete, safely eject the SD card, and we are ready to make all the hardware connections to our Pi:

  • Put the micro SD card into the Pi Zero W's SD card holder.
  • Attach the mini HDMI to HDMI cable to the video out port, then connect it to the HDMI cable, then connect that to the monitor
  • Attach the keyboard and mouse to the USB hub, then connect the hub to the USB OTG cable (if necessary) and connect that to the USB OTG port on the left (when holding the Pi Zero W face-up with the SD card holder to the left)
  • Finally attach the USB power supply to the USB port on the right, marked "PWR".

The Pi will now boot! In a minute or two, the desktop will be shown on the monitor. Most likely, the desktop will not fill the entire screen - we'll fix that in a moment.

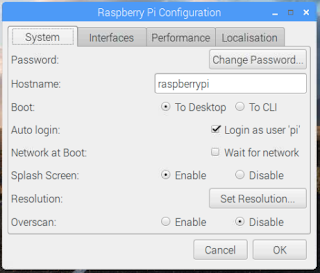
First, we must secure our Pi! By default, the username and password for the Pi is username = pi and password = raspberry. We'll change the password by going to the main menu (located at the top-left part of the desktop), and choosing Preferences | Raspberry Pi Configuration.

A window with four tabs should appear. In the first tab, click the "Change Password" button and enter a new password.

Finally, set the radio button at the bottom to disable overscan, which will fix the problem where the desktop doesn't fill the monitor. Press "OK" to dismiss the configuration dialog.

If the Pi doesn't reboot automatically, reboot it using Menu | Shutdown... and clicking the "Reboot" button.


Once the Pi reboots and you login using your new password, you should see that the desktop fills the entire screen.

Note: in the days before the Pixel UI, it was necessary to use the command line to fix the problem where the desktop doesn't fill the entire screen, as explained in this guide. While no longer necessary, that guide does make for interesting reading.

Configure WiFi to connect to your wireless network, and test the connection using a browser.

To adjust the time and keyboard, go to the main menu, choose Preferences | Raspberry Pi Configuration, and click the "Localisation" tab - notice the British spelling. Set the locale, timezone, and keyboard. Press "OK" and allow the Pi to reboot.

Now we update/upgrade Raspian by opening a terminal window and issuing the following two commands:

sudo apt-get update
sudo apt-get dist-upgrade -y

At this point, we have completed the bare minimum tasks needed to make the Pi usable!

Now we will set it up for remote access. As explained on the raspberrypi.org website, there are several ways of doing this. We will be using VNC, SSH, and SFTP.

  • VNC (Virtual Network Computing) allows the Pi desktop to be seen on other computers. Keyboard and mouse events will be sent to the Pi, and the result will be shown on that other computer
  • SSH (Secure Shell) works like a remote terminal, allowing us to use the Pi's command line from another computer
  • SFTP (Secure File Transfer Protocol) allows us to move files back and forth between the Pi and another computer.

First, open a terminal window and use either the command

hostname -I
or
ifconfig
to get the Pi's IP address on the network. The IP address of my Pi is 192.168.1.11.

Next, while we are still in the terminal, use this command to get the latest version of the RealVNC server and viewer:

sudo apt-get install realvnc-vnc-server realvnc-vnc-viewer

VNC server will allow us to remotely access the Pi's desktop, while the viewer will allow us to remotely access another computer from the desktop. For this, we will only be using the server.

Finally, go to Menu | Preferences | Raspberry Pi Configuration and enable SSH and VNC under the Interfaces tab. Also enable Serial, which will allow us to access the RasPi using a USB cable. Allow the Pi to reboot if necessary.

On a computer running Windows on the same network, download and install the VNC Viewer from https://www.realvnc.com/download/viewer/.

Run VNC Viewer, and connect to the Pi using the PI's IP address, username = pi, and whatever password you set for it. You can also give the Pi a friendly name, like "MQTT Broker". I chose that name since I intend to use this Pi as a MQTT broker - see next tutorial. You should see the Pi's desktop in the VNC Viewer's window, and mouse movement should be mirrored!

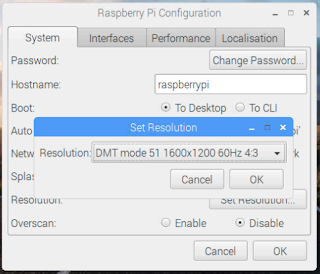
The size of the VNC viewer's window will, at first, match the resolution of the attached monitor. In order to get the same resolution with when there is no monitor attached, we need to specify the resolution. To do this, go to Menu | Preferences | Raspberry Pi Configuration and choose a resolution by clicking the "Set Resolution" button under the Interfaces tab. Let the RasPi reboot.

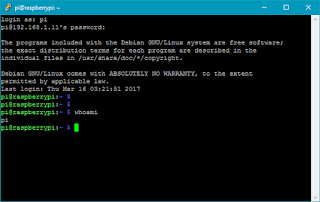
Next, we will get SSH working. Download and install PuTTY. Open it, and create a connection to the Pi using the same IP address, username, and new password.

After you click Connect, enter the new password and press enter.

A good command to try is

whoami
to ensure that you are indeed connected to the Pi using the username pi.

Finally, download and install the FileZilla Client, which is a SFTP client. Don't use quick connect. Instead, choose File | Site Manager, and enter the IP address, username, and new password.

Back to FileZilla. Press the "Connect" button and you should see two trees: the one on the left showing the folder organization on the Windows computer ("Local site"), and the one on the right showing the Pi's folder organization.

Try moving a small text file from the Windows computer to the Pi's Downloads folder (located at /home/pi/Downloads). Then, either use VNC to check that the file is there, or use PuTTY to list the contents of that directory.

And that's it! The display, USB hub, keyboard, and mouse can now be removed and the Pi can be used remotely from another computer on the network!

Addendum: The steps listed here are identical when using Mac OS X, but we need a different piece of software to burn the Raspian image onto the SD card. A good choice for the Mac is Etcher, which can be downloaded from https://etcher.io/.

RealVNC also has a version of VNC Viewer for the Mac, which can be downloaded from here: https://www.realvnc.com/download/viewer/macosx/

Instead of using PuTTY, use the built-in Terminal app on Mac OS X

Finally, there is also a version of FileZilla available for the Mac, which can be downloaded from https://www.realvnc.com/download/viewer/macosx/.