In this (exhaustive) step-by-step tutorial we will set-up a Raspberry Pi for remote access. This is done on the new Raspberry Pi Zero W, but the steps will be the same for a Pi 3 or any earlier Pi that has a WiFi dongle attached.
We will first set-up the Pi using a monitor, keyboard, and mouse. We next configure and test the software used to remotely connect to the Pi. Finally, we unplug the Pi's monitor, keyboard, and mouse.
Hardware requirements:
- Raspberry Pi Zero W
- Power supply with micro USB connector
- Micro SD card, class 10, at least 8 GB, but preferably 16 GB
- Nice to have: a sassy and protective case for the Pi Zero W - cases for the Zero 1.3 with camera connector seem to work OK
Hardware used to temporarily connect with the Pi until remote access is ready:
- Mini HDMI to standard HDMI adapter
- HDMI cable
- Monitor with HDMI port
- USB hub
- USB OTG micro B to A cable
- USB keyboard and mouse (Logitech wireless works well)
Software requirements:
We first need the latest version of Raspian (the Raspberry Pi Foundation's official Linux distro). Download it from raspberrypi.org. As of this writing, the latest version of Raspian is called "Raspian Jesse with Pixel". "Jesse" is the Raspian version, and "Pixel" is the name for the Pi's new desktop interface.
Once download is complete, unzip the file by right-clicking on it and choosing "Extract...".
Next, put the micro SD card into your computer's card slot, and use Win32 Disk Imager to burn the Raspian image onto that SD card.
Once that is complete, safely eject the SD card, and we are ready to make all the hardware connections to our Pi:
- Put the micro SD card into the Pi Zero W's SD card holder.
- Attach the mini HDMI to HDMI cable to the video out port, then connect it to the HDMI cable, then connect that to the monitor
- Attach the keyboard and mouse to the USB hub, then connect the hub to the USB OTG cable (if necessary) and connect that to the USB OTG port on the left (when holding the Pi Zero W face-up with the SD card holder to the left)
- Finally attach the USB power supply to the USB port on the right, marked "PWR".
The Pi will now boot! In a minute or two, the desktop will be shown on the monitor. Most likely, the desktop will not fill the entire screen - we'll fix that in a moment.
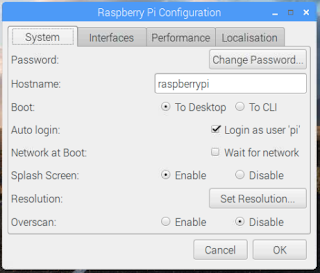
First, we must secure our Pi! By default, the username and password for the Pi is username = pi and password = raspberry. We'll change the password by going to the main menu (located at the top-left part of the desktop), and choosing Preferences | Raspberry Pi Configuration.
A window with four tabs should appear. In the first tab, click the "Change Password" button and enter a new password.Finally, set the radio button at the bottom to disable overscan, which will fix the problem where the desktop doesn't fill the monitor. Press "OK" to dismiss the configuration dialog.
If the Pi doesn't reboot automatically, reboot it using Menu | Shutdown... and clicking the "Reboot" button.
Once the Pi reboots and you login using your new password, you should see that the desktop fills the entire screen.
Note: in the days before the Pixel UI, it was necessary to use the command line to fix the problem where the desktop doesn't fill the entire screen, as explained in this guide. While no longer necessary, that guide does make for interesting reading.
Configure WiFi to connect to your wireless network, and test the connection using a browser.
To adjust the time and keyboard, go to the main menu, choose Preferences | Raspberry Pi Configuration, and click the "Localisation" tab - notice the British spelling. Set the locale, timezone, and keyboard. Press "OK" and allow the Pi to reboot.
Now we update/upgrade Raspian by opening a terminal window and issuing the following two commands:
sudo apt-get update

sudo apt-get dist-upgrade -y
At this point, we have completed the bare minimum tasks needed to make the Pi usable!
Now we will set it up for remote access. As explained on the raspberrypi.org website, there are several ways of doing this. We will be using VNC, SSH, and SFTP.
- VNC (Virtual Network Computing) allows the Pi desktop to be seen on other computers. Keyboard and mouse events will be sent to the Pi, and the result will be shown on that other computer
- SSH (Secure Shell) works like a remote terminal, allowing us to use the Pi's command line from another computer
- SFTP (Secure File Transfer Protocol) allows us to move files back and forth between the Pi and another computer.
First, open a terminal window and use either the command
hostname -IifconfigNext, while we are still in the terminal, use this command to get the latest version of the RealVNC server and viewer:
sudo apt-get install realvnc-vnc-server realvnc-vnc-viewerVNC server will allow us to remotely access the Pi's desktop, while the viewer will allow us to remotely access another computer from the desktop. For this, we will only be using the server.
Finally, go to Menu | Preferences | Raspberry Pi Configuration and enable SSH and VNC under the Interfaces tab. Also enable Serial, which will allow us to access the RasPi using a USB cable. Allow the Pi to reboot if necessary.
On a computer running Windows on the same network, download and install the VNC Viewer from https://www.realvnc.com/download/viewer/.
Run VNC Viewer, and connect to the Pi using the PI's IP address, username = pi, and whatever password you set for it. You can also give the Pi a friendly name, like "MQTT Broker". I chose that name since I intend to use this Pi as a MQTT broker - see next tutorial. You should see the Pi's desktop in the VNC Viewer's window, and mouse movement should be mirrored!
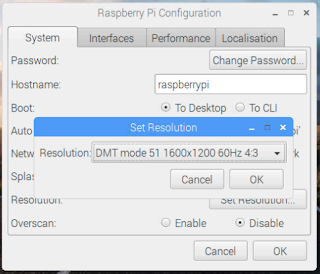
The size of the VNC viewer's window will, at first, match the resolution of the attached monitor. In order to get the same resolution with when there is no monitor attached, we need to specify the resolution. To do this, go to Menu | Preferences | Raspberry Pi Configuration and choose a resolution by clicking the "Set Resolution" button under the Interfaces tab. Let the RasPi reboot.
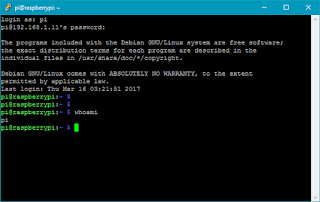
Next, we will get SSH working. Download and install PuTTY. Open it, and create a connection to the Pi using the same IP address, username, and new password.
After you click Connect, enter the new password and press enter.
A good command to try is
whoamiFinally, download and install the FileZilla Client, which is a SFTP client. Don't use quick connect. Instead, choose File | Site Manager, and enter the IP address, username, and new password.
Back to FileZilla. Press the "Connect" button and you should see two trees: the one on the left showing the folder organization on the Windows computer ("Local site"), and the one on the right showing the Pi's folder organization.
Try moving a small text file from the Windows computer to the Pi's Downloads folder (located at /home/pi/Downloads). Then, either use VNC to check that the file is there, or use PuTTY to list the contents of that directory.And that's it! The display, USB hub, keyboard, and mouse can now be removed and the Pi can be used remotely from another computer on the network!
Addendum: The steps listed here are identical when using Mac OS X, but we need a different piece of software to burn the Raspian image onto the SD card. A good choice for the Mac is Etcher, which can be downloaded from https://etcher.io/.
RealVNC also has a version of VNC Viewer for the Mac, which can be downloaded from here: https://www.realvnc.com/download/viewer/macosx/
Instead of using PuTTY, use the built-in Terminal app on Mac OS X
Finally, there is also a version of FileZilla available for the Mac, which can be downloaded from https://www.realvnc.com/download/viewer/macosx/.


No comments:
Post a Comment