The ESP8266 can be programmed in several different languages - great! Besides the C++-ish language we've been using, the ESP8266 can be coded in Python, BASIC, Lua, JavaScript, and others. This post demonstrates installing MicroPython on a NodeMCU, getting to the REPL, and trying some different commands.
MicroPython is an interpreted language, so programs will not run as fast as they would when written in a compiled language. With Arduino, there is not only an IDE, but also a large collection of libraries. With MicroPython, there is no solid IDE and there aren't nearly as many libraries. However, MicroPython for the ESP8266 does support WiFi, GPIO, I2C, SPI, etc. Further, the documentation is excellent, and there are excellent tutorials available. The post is based on that documentation.
Before we start, there are several things to know. First, since Python is an interpreted language, a common way to interact with MicroPython is through a specific shell called REPL: read-evaluate-print-loop. This is an interactive environment that allows us to run single lines of code, or blocks of code. Second, Python does not use braces to delimit code blocks like C, C++, JavaScript, etc. Instead, it uses the tab character to indicate lines of code are within a block.
In this post, we will do the following:
- Get and Deploy the MicroPython Firmware
- Use the Serial Port to Get to the REPL
- Examine the File System
- Run a Simple Python Program Stored in the File System
Get and Deploy the Firmware
In order to run MicroPython, a special firmware must first be deployed to the ESP8266. We also need a program to actually perform the flashing.
Step 1: Download the firmware from this URL:
http://micropython.org/download#esp8266
The file I chose was esp8266-20171101-v1.9.3.bin and it was saved in the Downloads folder. There is no need to upzip this file - instead it will be flashed to the ESP8266.
The remainder of the steps will be performed in the Mac OS X Terminal, and it assumes that Python is installed.
Step 2: Install esptool.py, which actually performs the flash. Open a Terminal window and run:
pip install esptool
Note: if you already have esptool.py installed, you can upgrade to the latest version using:
pip install esptool --upgrade
Step 3: Get the port the ESP8266 is attached to by running this command from the terminal:
ls -l /dev/tty.*
Mine is on /dev/tty.SLAB_USBtoUART
Step 4: Erase the flash memory:
esptool.py --port /dev/tty.SLAB_USBtoUART erase_flash
Step 5: Finally, deploy the new firmware:
esptool.py --port /dev/tty.SLAB_USBtoUART --baud 460800 write_flash --flash_size=detect 0 Downloads/esp8266-20171101-v1.9.3.bin
Getting to the REPL using the Serial Port
There are two ways to get to the REPL: wired using the serial port, or wireless using webREPL. We cover only the wired approach here.
On Mac OSX, use the following:
screen /dev/tty.SLAB_USBtoUART 115200
Then press Enter a few times until you get the ">>>" REPL prompt.
One command to try is:
print("Hello, world!")
Another thing to try is simple arithmetic:
1+2

To find out the version of MicroPython running on the ESP8266, enter the following two commands:
import sys

print(sys.version)
The version I have is 3.4.0.
An interesting series of commands to try is this:
import machine

pin = machine.Pin(2, machine.Pin.OUT)

pin.value()

pin.off()

pin.value()

pin.on()

pin.value()
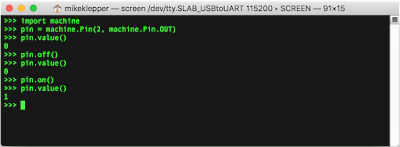
These commands reveal that the built-in LED on the NodeMCU is "wired backwards", but that it can indeed be controlled via REPL.
Functions are defined as follows:
def toggle(p):

    p.value(not p.value())
Press Enter several times to finish the function definition.
Here is a simple program to call this toggle function once every 500 ms:
import time

import machine

pin = machine.Pin(2, machine.Pin.OUT)

while True:

    toggle(pin)

    time.sleep_ms(500)
Press Enter several times, and the LED will start blinking!
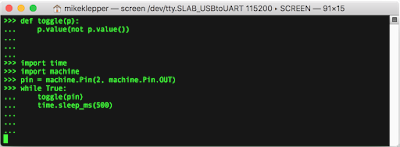
To exit this loop, press Control-C, which will generate a KeyboardInterrupt.
The File System
When the firmware is installed, a small filesystem is created. To start using it,
import os
To get the current directory,
os.getcwd()
which will return '/' - the root.
To get a list of all files and subdirectories in the current directory, use\
os.listdir()
which returns
['boot.py']
We will discuss this file shortly.
To make a directory:
os.mkdir("MyDirectory")
Move into that directory:
os.chdir("MyDirectory")
Now let's make a file while we're in that directory:
f = open("MyFile.txt", "w")

f.write("Hello, world!")

f.close()
Just after the write command is executed, the number "13" is displayed, indicating that 13 characters were written to MyFile.txt.
Now if we list directory contents using os.listdir(), we see:
['MyFile.txt']
Now open the file, read the content, then close it:
f = open("MyFile.txt")

f.read()

f.close()
and 'Hello, world!' is displayed.
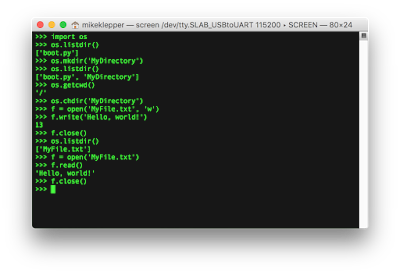
Files are removed as follows:
os.remove('MyFile.txt')
And os.listdir() returns []. We move up one level with
os.chdir('..')
Remove the directory with
os.rmdir('MyDirectory')
Let's examine boot.py using
f = open('boot.py')

f.read()

f.close()
Here's the result:
# This file is executed on every boot (including wake-boot from deepsleep)\n#import esp\n#esp.osdebug(None)\nimport gc\n#import webrepl\n#webrepl.start()\ngc.collect()\n
Replacing the '\n' with newlines shows:
# This file is executed on every boot (including wake-boot from deepsleep)

#import esp

#esp.osdebug(None)

import gc

#import webrepl

#webrepl.start()

gc.collect()
The majority of the lines in this file have been commented-out, but notice the reference to WebREPL, we'll save that for a later blog post!
Saving and Running a Simple Python Program
Now we create a simple one-line MicroPython program and execute it!
f = open("Test.py", "w")

f.write('print("Hello, world!")')

f.close()
To run this program, do the following:
exec(open("Test.py").read())
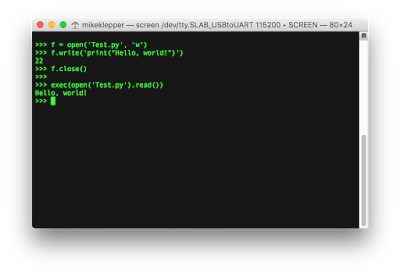
We get the expected output. Note that this method of running Python programs does not necessarily make global and local variables available to Test.py.
Finally, to exit: press Control-a then Control-\
and in response to the "Really quit and kill all your windows [y/n]" prompt, press y.
If the ESP8266 is rebooted, Test.py will NOT run. As it goes, the ESP8266 running MicroPython will first execute code in boot.py, then it will execute main.py, if that file exists. We will demonstrate this in the next blog post.
So now we know how to manually create a Python program, but it is terribly inconvenient. This points to the problem of how to conveniently enter and run MicroPython programs on our ESP8266. We will (partially) solve that problem in the next post!


